Had an amazing time in Class 1! Here's my progress reel for Animation Mentor Class 1. YAY! Hope you guys like it! I was so busy wrapping things up for class 1 that I totally forgot to write posts for the last two assignments (Vanilla Walks and Personality Walks). I will be posting soon along with some tips and technique for minimizing the pain and "pops" when doing walks. :)

My Animation Journal
Monday, October 1, 2012
Sunday, September 30, 2012
Class 1 / Week 11: Personality Walk (Polishing)
Bitter sweet moment! Week 11 was the last week of assignments for Class 1 so for this week we had to to spline and polish our personality walk. This is the first time for me, with an AM assignment, that I had a clear picture in my head of how I wanted the animation to look like and the end result was somewhat similar. Not perfect, by no means! But I did feel proud of my work for once in Class 1! Major thanks to AM, the students, my classmates and my awesome mentor, Nate Wall and my family for always making me push the extra mile. As some of you already know, I was completely new to animation and without these guys, I'd probably be stuck trying to figure out how to do a simple bouncing ball. :)
Here's my final assignments for Week 11. I also had to do a pose depicting "Balance".


Sunday, September 23, 2012
Class 1 / Week 10: Personality Walk (Blocking)
More walks! For the Class 1 final assignment we had to do another walk but this time our goal was to do a walk with personality. Personally, this was my favorite assignment for the whole term and the week's lecture with Carlos Baena was awesome! Tons of content and tips on how to portray a character's personality through a walk. We also had to do research on walks, watch movies with characters with interesting walks and record our own reference. I've never had so much fun doing homework! Where else you get to watch movies and cartoons for reference and then record yourself acting stupid and walking like an idiot in front of the camera? Love it! I posted all the reference shots below that I used for my shot. Some of them are pretty silly! :) We also had to pose STU depicting "exhaustion". The pose I did pretty much portrays how I felt by then end of Class 1! hahaha


Friday, September 21, 2012
Class 1 / Week 9: "Vanilla" Walk / Polishing
The assignment for this week was basically work on any revisions for the blocking pass and add more details to the animation. Some might call this stage: blocking plus. Once we finish our blocking plus we can finally move into spline mode. Also for blocking plus, I turned all my keys into "Linear" mode. This way I could have a better visual of what my timing was looking like. At this stage, knee pops might be a bit more obvious.
Here's some of the things I focused on during the blocking plus stage:
Hips: Added hip rotations and some overlap between the side to side/ up and down movement.
Feet: I chose to animate straight ahead, frame by frame. At this stage, I also added some drag and overlap on the feet. Just be careful of adding too much or it might add to much personality to the "Vanilla" walk. Remember, this is a very basic walk. I also went back and double checked my feet placement and corrected any sliding on my feet, if any. Also worked on the peeling of the foot as it lifts off the ground. It should be nice and smooth as it makes contact and lifts the foot again.
Arcs: The cleaner the arcs the smoother the animation and the less chances of getting those pesky knee pops. I used the arc tracker tool from AM to track all my arcs.
Polishing / Final
I'm ready to spline and polish the animation. Yikes! Once splined, I went in order of hierarchy and clean up all my key frames/ tangents. I started by the hips, worked my way to the feet and finally the legs. Make sure to work on the hips first, the feet and finally the legs. Otherwise you might find yourself going back and forth between the poses fixing and breaking things.
Knee Pops:
One trick I learned from Bobby Beck was to used the stretch knee controller on Ballie to fix any knee pops that you may have. Just be careful not to stretch or shrink the leg too much, otherwise it might start looking a bit odd and deformed. Also, remember not to lose your key poses when using the stretch controller. Before my revision, I made the mistake of using the stretch controller too much and lost some of my extremes down poses. Lesson learned! ;)
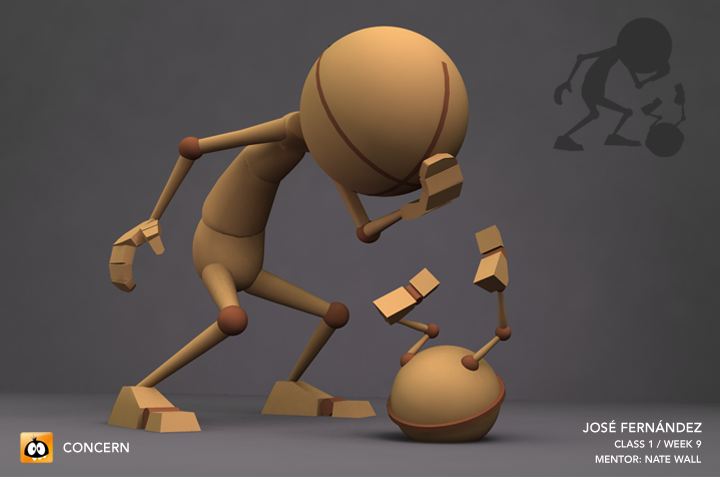
For this week I also had to do a pose with STU depicting "concern".


Here's some of the things I focused on during the blocking plus stage:
Hips: Added hip rotations and some overlap between the side to side/ up and down movement.
Feet: I chose to animate straight ahead, frame by frame. At this stage, I also added some drag and overlap on the feet. Just be careful of adding too much or it might add to much personality to the "Vanilla" walk. Remember, this is a very basic walk. I also went back and double checked my feet placement and corrected any sliding on my feet, if any. Also worked on the peeling of the foot as it lifts off the ground. It should be nice and smooth as it makes contact and lifts the foot again.
Arcs: The cleaner the arcs the smoother the animation and the less chances of getting those pesky knee pops. I used the arc tracker tool from AM to track all my arcs.
Polishing / Final
I'm ready to spline and polish the animation. Yikes! Once splined, I went in order of hierarchy and clean up all my key frames/ tangents. I started by the hips, worked my way to the feet and finally the legs. Make sure to work on the hips first, the feet and finally the legs. Otherwise you might find yourself going back and forth between the poses fixing and breaking things.
Knee Pops:
One trick I learned from Bobby Beck was to used the stretch knee controller on Ballie to fix any knee pops that you may have. Just be careful not to stretch or shrink the leg too much, otherwise it might start looking a bit odd and deformed. Also, remember not to lose your key poses when using the stretch controller. Before my revision, I made the mistake of using the stretch controller too much and lost some of my extremes down poses. Lesson learned! ;)
For this week I also had to do a pose with STU depicting "concern".

Tuesday, September 18, 2012
Class 1 / Week 8: Introduction to Walks / Blocking
This week we finally got introduced to a very important animation body mechanic, walks. Personally, this one of my favorite subjects to study in people. I always found myself observing how people walk and how each person's walk is different from one another. There's so much you can tell from a person's way of walking. Are they walking fast or slow? Maybe their torso is up straight? Or is it be hunched over? Is the person limping or skipping? All of this little nuances like this can give out so much information about a person's personality or history.
For this week, our assignment was to create a "Vanilla" Walk. In other words a "basic" or "standard" walk. This means it shouldn't have any personality or character. Or like my mentor said: "Keep it boring!" Also, the STU pose for this week was strength.
Walks are hard! Animating walks is one of the most difficult things to do. The entire body is in motion during a walk so it's very important for us as animators to understand how it all works together. Luckily, for this assignment we start off with the "Ballie" rig so we can focus on understanding the mechanics of the hips and legs and their relationship to one another without worrying about the spine, arms, hands and head. We'll be introduced to full body mechanics in Class 2. Yikes! ;)
For this week we only had to block out the animation in Stepped Keys and creating our basic key poses that make up a "Vanilla" walk.
For a Vanilla Walk all we need to do is follow the recipe. There's 3 main components that make up a walk:
Keys: contact positions
Breakdowns: passing position
Extremes: lowest and highest points of the walk
Timing: in two's / 2 steps per second (24 frames)
Tips:


For this week, our assignment was to create a "Vanilla" Walk. In other words a "basic" or "standard" walk. This means it shouldn't have any personality or character. Or like my mentor said: "Keep it boring!" Also, the STU pose for this week was strength.
Walks are hard! Animating walks is one of the most difficult things to do. The entire body is in motion during a walk so it's very important for us as animators to understand how it all works together. Luckily, for this assignment we start off with the "Ballie" rig so we can focus on understanding the mechanics of the hips and legs and their relationship to one another without worrying about the spine, arms, hands and head. We'll be introduced to full body mechanics in Class 2. Yikes! ;)
For this week we only had to block out the animation in Stepped Keys and creating our basic key poses that make up a "Vanilla" walk.
For a Vanilla Walk all we need to do is follow the recipe. There's 3 main components that make up a walk:
Keys: contact positions
Breakdowns: passing position
Extremes: lowest and highest points of the walk
Timing: in two's / 2 steps per second (24 frames)
 |
| From Richard Williams The Animator's Survival Kit |
Tips:
- Keep an eye on your forward translation . It should be a constant smooth line at all times. One trick I used was to switch from stepped to linear every now then on your Graph Editor. If the translate z/x looks a bit jagged, smooth it out and go back into stepped mode when you're done. You might have to go back and reposition the legs and feet. You'll thank me for this later, it will save you lots of work during splining.
- Always keep the contact foot "grounded" it should not move until it peel's off the ground. Otherwise you might get some sliding on the feet as it moves forward. Check those values on your channel box and make sure are identical.
- Keep track of the arcs and the spacing of the hips, legs, and feet between your poses. Any drastic change in spacing between the legs/knees and it's going to give you some pretty bad "pops' on the knees. Knee "pops" are unavoidable at this stage but if you keep your spacing nice and even with clean arcs, it might save you some headaches and a couple of keyboards smashes down the line.


Tuesday, September 11, 2012
Class 1 / Week 7: More Overlapping Action / Tailor
Before I forget, let me start of with saying that this week will test your patience! Week 7 was a continuation of the principles of Overlapping Action and Follow Through. But for this week's assignment we had to apply what we've learned from animating the Pendulum and apply the same concepts and principles to a character with a character rig named "Tailor". The challenging part of this assignment is not just adding overlap, but because tails work as an extremity of a living creature, in this case, a squirrel-like character. The movement is also affected by the animal's ability to control the tail. We must be really careful and study a tail's movement to make sure not only follows all the principles of overlapping action, but it must also feel "alive" and with character. We also had to apply all the principles learned in the previous sessions like the timing and spacing of a bouncing ball, anticipation and squash and stretch. This was probably the hardest assignment for me in the entire Class 1. I understood the concept pretty well in theory. I could animate the scene in 2D and illustrate the tail movements as well, but I couldn't get it to work in 3D. For some reason, I was having a lot of trouble visualizing the previous key frames and following the shape of the tail as it moved to the next frame. Also because of the rig's tail deformations, I was getting pretty bad deformations as the tail dragged and followed the arcs in those areas. Later on, I decided to start using a screen marker to draw on my screen on top of my frames and it finally started to come together. I think I went through 20 or so versions and revisions after receiving feedback from my classmates and mentor before I had something I was "kinda" happy with. YAY! :)

Monday, September 10, 2012
Class 1 / Week 6: Overlapping Action
Week 6 was another fun yet challenging assignment! We were introduced to another principle of animation: Overlapping Action. This principle is the essential ingredient for making your animation feel "organic"by breaking up the movement so not everything happens at the same time.
For this week's assignment we had to create an animation of a pendulum with it's root or main body moving from side to side or in a "Figure 8" motion and animate the overlapping action and successive breaking of joints on the pendulum.
Here are some of the terms that go hand in hand when creating Overlapping Action :
Overlap: Not all parts of the body start their movements at the same time. Each part of the body is affected by the part that is directly above them in a hierarchy. Example: shoulder, upper arm, lower, arm, wrist and fingers. Not everything happens at the same time, once sections of the body leads as the others follow and so on. This is also called: Successive Breaking of Joints
Follow Through: generated by external forces such as weight, wind, gravity etc. For example tails, ears, hair and cloth. This can be animated once the main animation is done.
Drag: Also called as the Wave Principle. As the base or the main body moves the rest of the pieces will follow with a certain amount of drag until it catches up with the movement. The amount of drag depends on the speed and weight of the object in movement.
Lead and Follow: One object leads as the others parts are pulled behind.
*It is important to understand that all of this principles work closely together as a family and one cannot happen without the other.
My friend Lucas from Class 1 wrote a great post on his blog with lots of detailed information and illustrations on Overlapping Action. Make sure to check it out!
Here are my planning sketches and final animations after revisions.
Cheers! :)


Sunday, September 2, 2012
Class1 / Week 5: Anticipation, Squash and Stretch
How can I forget Week 5? It was a crazy week for me and I think it has been the busiest and hardest week since I started Animation Mentor. Not only the assignment jumps drastically in difficulty (at least for me) but I also was volunteering for this year's AM graduation, had a classmate visiting from LA to stay over, PLUS I was planning to attend Animation Mentor's Summer BBQ. Crazy week indeed but I had a blast and wouldn't change any of it. Except, maybe having a bit more extra time to polish my assignment.
This week's assignment was to have a ball with the weight of a basketball bounce around in an obstacle course. We also had to add two new principles to our assignment: anticipation and squash and stretch. The cool thing about this assignment is that we were giving a set of 11 different courses to choose from, each with their own level of difficulty. I thought I choose wisely, but think again! We use a term in animation called K.I.S.S. (Keep It Simple Stupid) and as much I tried to keep it simple, I ended up with a very complicated obstacle course. Lots of changes of direction, speed and mechanical props in my scene. I also had to work on a pose depicting "Devastation"
Despite the crazy schedule and the increase level of difficulty of the assignment, it was still lots of fun to animate. I learned A LOT about timing and spacing this week. With tons of mistakes and revisions! My ecritique was like 15 minutes long! Some students are afraid of making mistakes and they are forgetting that now is the best time to make mistakes and learn from them. And I include myself, first few assignments a was bit too uptight about grades and making everything perfect. But after getting your first C on an assignment, it will humble you really fast. I started to loosen up a bit after week 5 and it's been great so far! There's a lot to be learn from our mistakes so take advantage and experiment with your animation. I tend to learn faster by trial and error so I thought it was a great learning experience for me.
Below are my assignments for Week 5 after going back and reworking the animations and applying all of my mentor's notes. I wasn't too happy with the outcome of the Obstacle Course so I did a second version just for fun.


Sunday, August 19, 2012
Class1 / Week 4: Intro to Timing and Spacing
On week 4 we were introduced to yet another principle of animation: Timing and Spacing. Is one of the most important concepts in animation and they are both work closely together side by side.
For this week's assignment we had to create another bouncing ball animation but this time we had to show a contrast in weights (Light vs Heavy) between the two balls. Example: Ping pong vs. bowling ball or beach ball vs cannon ball, etc. I choose beach ball vs bowling ball.
It was a fun assignment! I wanted to shoot the reference myself so I ended up buying a bowling ball from the thrift store for $2.50 and got a beach ball for $1 at the Dollar Store. Cheapest shopping EVER! My neighbors had to be so pissed that day, I was bouncing a bowling ball on the roof of the parking garage. Yep, It was loud! Anyways, see below for my week's assignments and some extra info on Timing and Spacing. Cheers!

Timing is the amount of frames you give to each movement. In other words, is the amount of time it takes for something to happen. Spacing is the amount of frames you leave between the poses and how far apart each pose is from each other. The closer and tighter the spacing, the slower the movement. The bigger the gap between the drawings, the faster the movement. See below for example from Richard William's Animator's Survival Kit:

How can you tell something has good timing vs bad timing?
Good timing in animation is pleasing to watch, objects in motion have the sense of weight and real world physics are applied and the audience has an easier time following the movements. Bad timing looks mechanical with no life and no sense of purpose to the movement. In computer animation is easier to fall in the trap of bad timing and spacing. Computer Animation softwares create a perfect interpolation or in betweens. This is NOT what we want. It is our job as computer animators to tell the computer what to do and not the other way around. So for those out there that think the computer does everything for us. THINK AGAIN! :)
"Spacing Is The Tricky Part. Good animation spacing is a rare commodity" - Richard Williams, Animator's Survival Kit.
For this week's assignment we had to create another bouncing ball animation but this time we had to show a contrast in weights (Light vs Heavy) between the two balls. Example: Ping pong vs. bowling ball or beach ball vs cannon ball, etc. I choose beach ball vs bowling ball.
It was a fun assignment! I wanted to shoot the reference myself so I ended up buying a bowling ball from the thrift store for $2.50 and got a beach ball for $1 at the Dollar Store. Cheapest shopping EVER! My neighbors had to be so pissed that day, I was bouncing a bowling ball on the roof of the parking garage. Yep, It was loud! Anyways, see below for my week's assignments and some extra info on Timing and Spacing. Cheers!

Timing and Spacing:

How can you tell something has good timing vs bad timing?
Good timing in animation is pleasing to watch, objects in motion have the sense of weight and real world physics are applied and the audience has an easier time following the movements. Bad timing looks mechanical with no life and no sense of purpose to the movement. In computer animation is easier to fall in the trap of bad timing and spacing. Computer Animation softwares create a perfect interpolation or in betweens. This is NOT what we want. It is our job as computer animators to tell the computer what to do and not the other way around. So for those out there that think the computer does everything for us. THINK AGAIN! :)
Monday, August 6, 2012
AM Class 1 / Week 3: Bouncing Ball
Another late post! GEEZ! I'll be posting my other assignments and other tips soon. I don't remember being this busy with life and school but I'm doing my best to keep with the blog.
This week's assignment was all about the bouncing ball, planning the animation and observing reference material. We also had to sketch different poses of a human character communication "Excitement" then choosing one to pose with STU. Which by the way, it was one of the the most challenging assignments I've ever gotten to date and YES, even through my early days of art school. Getting emotion out of a lifeless character with no face is incredibly challenging! I think I did over 15 revision before going into the final one. Not to mention the later revision after my mentor's critique. :)
The bouncing ball is one of the most important assignment as you learn animation. There's so much information that goes on with the bouncing ball and as an animation student it's super important to understand it. Learning the mechanics of how a bouncing ball moves and reacts to gravity, along with the ball's density(weight) and momentum is key to understanding how animation works. For this particular assignment we had to animate the bouncing ball with the weight and bounce of a Basketball or Soccer Ball. You'll begin to see in my later posts how all my assignments relate back to the concept of the bouncing ball. That's it for now! Hope you guys like it. :)


Tuesday, July 24, 2012
Class1 / Week 2: Basic Foundations
One of 12 Principles of Animation is "Solid Posing". Without a solid pose any great idea or story can easily get lost in translation, no matter how good the dialogue is. We need to learn to pose our characters in order to convey their emotions properly and create a connection between the audience and the characters in a scene.
Week 2 assignment for Animation Mentor was all about observation and capturing emotions. We had to get out there and observe people, their mannerism, how they walks, how they sit, how they interact with each other, etc. Are they sad, thoughtful or are they excited? As we took mental notes of our observations we also had to do quick sketches of our surroundings. Our goal was to capture their energy, posture, and attitude through a simple gesture. Once we had enough gestures to pick from then we had to choose our favorite one and recreate the pose in Maya using AM's STU rig. Below you can see my sketches and final assignment after my mentor's revisions.


- Capture the essence of the pose, not the details.
- Think verbs not nouns. Example: If you see someone pushing a box, don't look at the person and think: "the arm goes here and the foot goes there, etc." Instead, think about "pushing" and the forces that are driving the action, think about the line of action and the rhythmic lines that flow through the body.
-Always imagine yourself taking the same pose.
-Line of Action
-Try to use a pen not a pencil. Because you can't erase this will force you to think about your line before putting it down on paper.
I know it's easier said than done but once you get in the habit of sketching everyday, you'll start seeing the line of action and the rhythmic lines that drive the pose more quickly.
Force Drawing by Michael Matessi
Simplified Drawing for Animation
Any book from Glenn Vilppu
Gesture Drawing for Animation by Walt Stanchfield
George Bridgman Drawing from Life (This is if you want to learn anatomy)
The illusion of Life from Disney also has a lot of examples on gestures and quick sketches.
That's it, that's my secret! There’s no right or wrong way of sketching so feel free to experiment and decide what works best for you. Hope it helps! If you need an extra eye on your sketches, let me know. Have a great week!
-Jose


Here’s are a couple of pointers for gestures and capturing the energy on your poses:
- Capture the essence of the pose, not the details.
- Think verbs not nouns. Example: If you see someone pushing a box, don't look at the person and think: "the arm goes here and the foot goes there, etc." Instead, think about "pushing" and the forces that are driving the action, think about the line of action and the rhythmic lines that flow through the body.
-Always imagine yourself taking the same pose.
-Line of Action
-Try to use a pen not a pencil. Because you can't erase this will force you to think about your line before putting it down on paper.
I know it's easier said than done but once you get in the habit of sketching everyday, you'll start seeing the line of action and the rhythmic lines that drive the pose more quickly.
For books, they are plenty out there, but these are my favorites:
Force Drawing by Michael Matessi
Simplified Drawing for Animation
Any book from Glenn Vilppu
Gesture Drawing for Animation by Walt Stanchfield
George Bridgman Drawing from Life (This is if you want to learn anatomy)
The illusion of Life from Disney also has a lot of examples on gestures and quick sketches.
That's it, that's my secret! There’s no right or wrong way of sketching so feel free to experiment and decide what works best for you. Hope it helps! If you need an extra eye on your sketches, let me know. Have a great week!
-Jose
Tuesday, July 17, 2012
AM Class 1 / Week 1: And My Mentor Is...
I've been so busy lately getting in the groove of managing AM assignments, work and life in general that I completely forgot to update my blog and write about my experience in the first 4 weeks of Class 1 at Animation Mentor.


First day of class was pretty amazing and our Facebook group started a countdown as the time of reopening the AM Campus approached.We actually set a new record in comments in a post, I think we ended up with 150 comments total in less than 5 minutes and my iphone was going crazy with messages from all my classmates. We also had our own little virtual fireworks display just for fun! GOOD TIMES! Such an awesome group! I couldn't be more happier with my graduation class. You guys rock!
Once the AM Campus opened I quick rushed to check who my mentor was. I got Nate Wall from Dreamworks. Yup, That's right! DREAMWORKS! He's currently working on the animated film Turbo and also worked on the recent release Madagascar 3. He also previously worked at Blue Sky Studios on films like Ice Age: Dawn of the Dinosaurs and Rio. I'm super excited to have the opportunity to learn from one of the great animators in the industry. Such a humbling experience, to just sit and listen to their stories, talk about their experiences in the animation industry and passing their incredible knowledge down to us. But the most amazing part is that they get to critique our assignments and help us make the most out of them. First week basically consisted of getting familiar with the online campus and watching training videos, so no animation assignments for week 1. Things definitely started to gradually pick up the pace after the first week as you will notice in my next few posts. I'll be posting my assignments for Week 2 & 3 in the next few days to finally catch up on my posts along with some thoughts on my progress, tips that I've learned and my experience so far.


Friday, June 8, 2012
Saturday, June 2, 2012

AM Springboard: Week 9 Basic Step
It's time to move on to Class 1! I'm super excited! Stoked! Thrilled! Jumping up and down and off the wall like an idiot would be a better description! - But you get the point. Springboard is finally over! Had such a great time with my mentor, classmates and learning the animation tools from Maya. And to think we didn't even scratched the surface yet. I still have huge amounts of stuff to learn along the way, Maya is such a complex piece of software. I'm also a bit nervous! Remember that feeling of going to college for the first time? Same thing here! We are currently scheduled to start a few weeks from now. In the meantime, I'll try to enjoy the free time with my family and maybe put together a small progress reel with my Springboard assignments.
Here's my final assignment for AM springboard, hope you guys like it!
Cheers!
Jose
Here's my final assignment for AM springboard, hope you guys like it!
Cheers!
Jose
Saturday, May 26, 2012
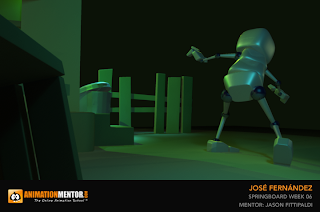
AM Springboard: Week 9 Robot Arm
This week was a continuation from last week's Robot Arm animation. The focus for this exercise was to clean up the animation (move from block to spline) and learn how to use Parent Constraints. YIKES! Without going into much technical details, Parent Constraints are used when an object (the parent) drives another object's Translation and Rotation data. In my case the Robot's Arm (parent/driver) grabs the Can (child) from one side of the screen to the other. This method is useful for when you have a character in a scene interacting or holding different kinds of objects. There's a lot of information on this subject, and I'm still trying to wrap my head around the technical aspects of using constraints, but for now that's pretty much the basic explanation what constraints are and how they work.
Besides using constraints, I tried to experiment with different types of workflows. Moving from block to spline can be intimidating and things can get all crazy! So I decided to try different methods just to understand how each type of spline worked and how they affected my blocking. Trial and error is one of favorites methods of learning, so why not? I had a couple of late nights (with lots of coffee) trying to figure out and clean up my animation to a point I was happy. Totally worth it! There's so much you can learn from experimentation and making mistakes. Not to mention all the stuff I learned from the awesome feedback I got from other AM students, they are always there for you when you need an extra pair of eyes and to keep you motivated. :)
Have a great Memorial Weekend!
-Jose
Sunday, May 20, 2012
AM Springboard: Week 8
I can't believe we are done with Week 8 already, 2 more weeks and AM Springboard is over! I'm having such a great time with the animation assignments and just absorbing about every little piece of information our mentor and lecture has given us. Things like the Graph Editor, tangent types and splines are finally clicking and making sense to me. The Graph Editor was such a confusing and foreign tool for me but now I'm beginning to understand how powerful this tool can be for your animations.
The first assignment for the week was to animate a bouncing ball and then import our same animation of the bouncing ball once or twice. After importing your animation, our job was to use the Graph Editor to readjust the timing and values by scaling the keys up or down. It was a great exercise to work on! By doing so you have a better understanding how simple changes in the Graph Editor can affect your timing and sense of weight.
If you notice in my bouncing ball assignment below, the weight and timing of the balls are all different. It's basically the same animation for all 3 balls, I only scaled up or down the keys for each ball (some minor tweaks on the Translation X and Y) but for the most part is the same. Very cool trick!
Our second assignment was to work on a simple animation of a robot arm grabbing a can with a max of a 100 frames. It was a fairly open assignment so you can either go very simple or you can go crazy and built some character into your animation. I though it looked more like a mantis so I decided to approach it differently and give the robot some character. This week was our blocking pass only (that's why is still looks a little rough) but for next week's assignment I get to refine the details and clean up my animation. Should be fun! Hope you guys like it!
Happy animating!
Jose
Saturday, May 12, 2012
AM Springboard Week 7: Basic Animation 1 & 2
We finally got the ball rolling in animation this week - Literally! Really excited about the upcoming projects! :)
Here are couple of playblasts for this week's animation assignments:
Here are couple of playblasts for this week's animation assignments:
Sunday, May 6, 2012
AM Springboard: Week 6
Week 6 is finally over! Which means is all about animation from now on! :)
This week was a continuation of week 5 assignments. On our first assignment for week 6 we had to finish up our shot by adding different shaders and materials to our set and character using the Hypershade. Another part of our assignment was to continue polishing our shot by experimenting with different types of lights and using the 3 point lighting method. We also had to render out our scene by using Maya's software render but in my case I used Mental Ray. I also turned on Global Illumination and Final Gathering for better results. I'm pretty happy with the final results, this is the first time I tackle a project this complex in Maya. Great learning experience!
Here are my final renders for Springboard Week 6 with all the camera shots, shaders and lights:


Springboard Week 5: Notes
Selection Tools
-Select Tool and Soft Select Tool
-To Increase / Decrease size of Soft Select Tool (works with all brushes): B + Left Mouse Click Drag
Deleting History:
As you work in Maya, most of actions create nodes in the construction history of the objects you work on.
Delete history when you want to delete modeling operations from your object’s history or any nodes that my slow down your scene.
Freezing Transformations - Sets new point of origin for any given back to zero
Box Modeling Tips:
-Always model facing the X axis
-Never delete Edges or Vertices by hitting Delete. To remove: Go to Edit Mesh / Delete Edge Vertex
-Selecting a row of faces: select face, shift select 2nd face and double click.
-Repeats last action/tool: G
-Try setting the pivot points to center / bottom of object: makes for easier snapping to other objects or grid.
*Tip: To remove clutter or unwanted seen objects from the outliner: Go Display/ click on Shapes.
Parenting: Nesting objects into another’s objects hierarchy.
-To parent: Select child node then select parent node.
-Parent: P
-Unparent: Select Hierarchy, Shift P
*Tip: To select a parent object in group multiple parents hierarchy, press down key.
Outliner Tips:
Shift / click: Opens or closes all elements from the group.
Locking the camera:
-Select camera
-Select all input channels
-Right Mouse click / Lock selected
*Tip: To lock camera on previous position, set a key on all input channels in F1.
*Tip: Left / Right Brackets keys: Undo for camera move.
Creating a simple Rig with Mel Script and Nurb Controllers:
-Create Nurbs Curves
-Select Nurbs Curves
-Press Down Key (selects shape node in channel box)
-Shift Select 2nd object you want to parent
-Type in Command Line (Mel Box): parent -r -s
Sunday, April 29, 2012
AM Springboard: Week 5
Week 5 for Maya Springboard was a bit more intense than last week since had 2 assignments due before each Q&A session with our mentor.
First assignment consisted of building a basic character model from polygons and nurbs with all objects in a hierarchy. Wait... what's a hierarchy? It's basically assigning a parent/child order to the character's joints so they move as they would in real life. For example, if I move the knee, the knee will move along with the lower leg and foot or if I move the upper torso, the arms and head will follow. By doing this correctly, you can easily pose your character in a scene. In other words, we had to create a very basic but fully functional rig.
The second assignment was super fun! It consisted of building a set for staging our previously created character to tell a story. We also had to create different cameras to frame different shots within the set.
Again, tons of information to absorb this week: modeling, hierarchy, pivot points, staging, camera angles, composition and how to use more tools in Maya. I'll be posting some my notes and tips from week 5 sessions later on this week. :)
Here are my final renders for Week 5 Springboard assignment:
- Jose


Monday, April 23, 2012
Session 1: MAYA BASICS Tips & Tricks
Geometry Selection:
Toggle between Items: ctrl + shift
Add Selection or Deselect: shift
Increase Size of Manipulator: - / + keys
*The bigger the size of the manipulator, the more sensitive it is to value changes. Adds greater control for precise value inputs.
Input Channel HotKeys:
Change value: middle mouse drag
Slows down value: ctrl / middle mouse drag
Speeds up value change: shift middle mouse drag
Manipulator Tip:
Non uniform Scale
ctrl-click on scale axis: scales in the other 2 axes.
Non uniform Scale and Move
ctrl-click on translate axis: only translate in the other 2 axes
*notice how the yellow box in the center of translate manipulator changes shape
ctrl-click center: go back to translate along view plane
Snapping Tools:
*Grid: x
*Curves: c
*Vertices: v
*middle mouse click for free move
*works with pivot points
Insert Key or Home Key (Mac): activate / deactivate pivot point
Change viewport background color: alt+b
Hope it helps! :)
- Jose
AM Springboard: Week 4
This week was awesome! We finally had our first Q&A! It was more like a meet and greet with my mentor and classmates. I had to introduce myself and give my mentor a quick recap of my Maya experience, past education and why I wanted to study animation. We also talked about our favorite movies, cartoons and animation studios. Our second Q&A with my mentor was an hour long demo to get the class ready for the first Springboard assignment. Jason, my mentor, went over Maya's user interface, basic navigation hot keys, creating basic geometry and customizing our user preferences. He was super informative and gave us some really cool tips and tricks for us to use in our assignment - I'll be posting later on this week some of my notes from the class.
My first assignment consisted of placing nurbs objects on a shelf and match it as close as possible to the reference image. It was pretty straight forward, but I'm sure for those who had never used Maya before it could be challenging. Specially, when trying to learn the navigation tools, hot keys, different camera views, etc. for the first time. It's a lot of info to take in one hour! My best advice is take as much notes as possible.
It was a great week overall! And before I forget, just as a side note - Q&A's and leaving feedback to other students on their work can be quite addicting! :)
Here's the final render of my 1st Springboard assignment...
Here's the final render of my 1st Springboard assignment...
- Jose


Sunday, April 15, 2012
AM Springboard Week 4 is Here!

Enough of orientation already! Tomorrow we start week 4 of Maya Springboard which means I get to go to my 1st Q&A with my mentor, Jason Fittipaldi. He currently works at Luma Pictures, the visual effects house responsible for blockbusters as Thor, Captain America: The First Avenger, Harry Potter and the Half-Blood Prince, Pirates of the Caribbean: At World's End and all four films in the Underworld series. How freaking cool it that!?! Let me wipe the drool of my face! lol I'll be also getting my new assignment for the week tomorrow which means my schedule in the next few days is going to get a bit crazy until I get back on to the groove of splitting my time between a full time job, my family and Animation Mentor. Let's get busy!
Best of luck to all Springboard students! :)
Jose
Friday, April 13, 2012

Wednesday, April 11, 2012
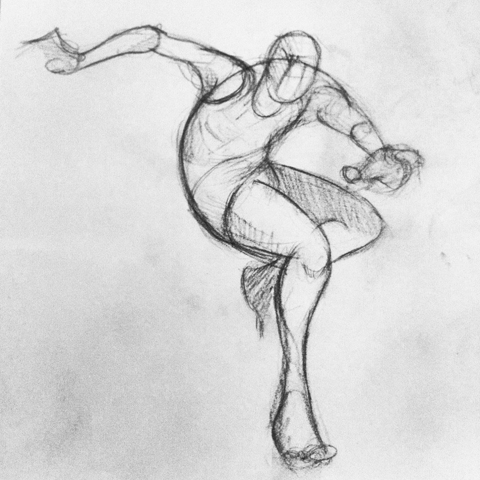
Morning Doodles!
As some of you may know, I've been sketching for at least an hour every morning (sometimes in the afternoon) during my train commute to work. My original intent was to learn how to simplify the figure to plan my animations and thumbnails faster. But as you can see on my latest sketches, I started mixing it up a bit by adding some details. I can't help it, I love figure drawing way too much! :) I've also been reading a lot Glenn Vilppu's Drawing Manual and Michael D. Matessi's Force Dynamic Drawing. Both are excellent books for animators and illustrators.
Cheers!
Jose


Cheers!
Jose


Saturday, April 7, 2012
Springboard Week 2
Here's a pose I did with Maya this morning. Just for fun and no reference, I started moving joints here and there keeping in mind the line of action, weight and silhouette. Can't help to get inspired by all the students from Class 01 doing all these great poses! We don't start assignments for Springboard until the 4th week, so for now it's mostly watching videos of how to use Maya, using the AM Tools and other orientation stuff.
Also, I've been learning so much from my AM friends. YES! - Friends! You spend so much time around all these talented people from all over the world, that I can't help but to start calling them friends already! I can't stress enough how important is to be active in the AM community by leaving feedback to other students about their work. Not only you train your eye, but you also learn how to give constructive criticism and how to accept it as well. The creative energy and the eagerness to learn from the AM community is AMAZING! - Honestly, more so than what I felt going to art school 10 years ago. And to think I'm only on my 2nd week of Springboard!
Have a great Easter weekend!
Jose
 |
| Giant Easter egg! NOOOOO! |
Wednesday, March 28, 2012
Bouncing Ball Test 2 Final
Here is the final rendered version of the bouncing ball test I 've been working on. I'm really happy with the results considering I have no clue as to what I'm doing sometimes. Major thanks to Sidd for the great tips on how to set up the scene for rendering in Mental Ray! :)
Hope you guys like it!
Jose
Hope you guys like it!
Jose
Lock & Loaded!
The wait is over! I finally started Animation Mentor's Springboard program! The first 3 weeks will be more like an orientation to get acquainted with the campus, new available tools and our mentors. The orientation video section consists of videos on how to get the most out of your Animation Mentor experience along with technical tips and other helpful material that's going to help us along the way. I strongly suggest going through every video at least twice. It's a lot of information to absorb. Between reading the syllabus, looking at videos and navigating the new added campus content, I was a bit overwhelmed at first. Just take a deep breath, take your time, go through the videos and make notes of important info you might find helpful. I also printed out my Springboard Syllabus just to have something to reference back to if I'm not around the computer. Lots of fun projects and material would be covered in the following weeks. Couldn't be more excited! GOOD TIMES! :D
Let's do this!!!

Let's do this!!!

Monday, March 26, 2012

Friday, March 23, 2012
Sketching Marathon Day 5
Today I couldn't make it to the 50 poses. Kinda disappointed! But I did managed to sketch up the last 10 poses I owe everyone at the Draw Now! since the sketching marathon started. Kenny Roy also gave me a huge compliment when I posted my sketches earlier today on Facebook. It's not everyday you get compliments from an artist and animator of his caliber. That made my day and it was a great boost of confidence! A clear reminder that practice and persistence always pays up. :)
Keep on sketchin' guys!
Jose

Thursday, March 22, 2012
Sketching Marathon Day 4
I missed today's 40 pose mark at today's Draw Now! marathon by only a few. I did manage to get 36 skeches! I don't think I've ever done this many sketches in one hour and I didn't even think it was possible! At this point, I ended up dropping all details and decided to stick with "stick" figures (pun intended) HA! :)
Cheers!
Jose


Subscribe to:
Posts (Atom)