Saturday, May 26, 2012

AM Springboard: Week 9 Robot Arm

This week was a continuation from last week's Robot Arm animation. The focus for this exercise was to clean up the animation (move from block to spline) and learn how to use Parent Constraints. YIKES! Without going into much technical details, Parent Constraints are used when an object (the parent) drives another object's Translation and Rotation data. In my case the Robot's Arm (parent/driver) grabs the Can (child) from one side of the screen to the other. This method is useful for when you have a character in a scene interacting or holding different kinds of objects. There's a lot of information on this subject, and I'm still trying to wrap my head around the technical aspects of using constraints, but for now that's pretty much the basic explanation what constraints are and how they work.

Besides using constraints, I tried to experiment with different types of workflows. Moving from block to spline can be intimidating and things can get all crazy! So I decided to try different methods just to understand how each type of spline worked and how they affected my blocking. Trial and error is one of favorites methods of learning, so why not? I had a couple of late nights (with lots of coffee) trying to figure out and clean up my animation to a point I was happy. Totally worth it! There's so much you can learn from experimentation and making mistakes. Not to mention all the stuff I learned from the awesome feedback I got from other AM students, they are always there for you when you need an extra pair of eyes and to keep you motivated. :)

Have a great Memorial Weekend!

-Jose

Sunday, May 20, 2012

AM Springboard: Week 8

I can't believe we are done with Week 8 already, 2 more weeks and AM Springboard is over! I'm having such a great time with the animation assignments and just absorbing about every little piece of information our mentor and lecture has given us. Things like the Graph Editor, tangent types and splines are finally clicking and making sense to me. The Graph Editor was such a confusing and foreign tool for me but now I'm beginning to understand how powerful this tool can be for your animations.

The first assignment for the week was to animate a bouncing ball and then import our same animation of the bouncing ball once or twice. After importing your animation, our job was to use the Graph Editor to readjust the timing and values by scaling the keys up or down. It was a great exercise to work on! By doing so you have a better understanding how simple changes in the Graph Editor can affect your timing and sense of weight.

If you notice in my bouncing ball assignment below, the weight and timing of the balls are all different. It's basically the same animation for all 3 balls, I only scaled up or down the keys for each ball (some minor tweaks on the Translation X and Y) but for the most part is the same. Very cool trick!

Our second assignment was to work on a simple animation of a robot arm grabbing a can with a max of a 100 frames. It was a fairly open assignment so you can either go very simple or you can go crazy and built some character into your animation. I though it looked more like a mantis so I decided to approach it differently and give the robot some character. This week was our blocking pass only (that's why is still looks a little rough) but for next week's assignment I get to refine the details and clean up my animation. Should be fun! Hope you guys like it!

Happy animating!
Jose


Saturday, May 12, 2012

AM Springboard Week 7: Basic Animation 1 & 2

We finally got the ball rolling in animation this week - Literally! Really excited about the upcoming projects! :)

Here are couple of playblasts for this week's animation assignments:


Sunday, May 6, 2012

AM Springboard: Week 6

Week 6 is finally over! Which means is all about animation from now on! :)

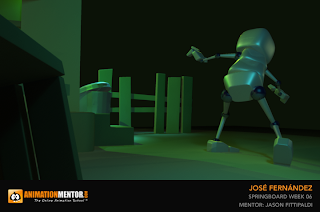
This week was a continuation of week 5 assignments. On our first assignment for week 6 we had to finish up our shot by adding different shaders and materials to our set and character using the Hypershade. Another part of our assignment was to continue polishing our shot by experimenting with different types of lights and using the 3 point lighting method. We also had to render out our scene by using Maya's software render but in my case I used Mental Ray. I also turned on Global Illumination and Final Gathering for better results. I'm pretty happy with the final results, this is the first time I tackle a project this complex in Maya. Great learning experience!

Here are my final renders for Springboard Week 6 with all the camera shots, shaders and lights:

Animation Mentor Springboard Week 6

Animation Mentor Springboard Week 6

Animation Mentor Springboard Week 6

Animation Mentor Springboard Week 6


Springboard Week 5: Notes

Selection Tools

-Select Tool and Soft Select Tool

-To Increase / Decrease size of Soft Select Tool (works with all brushes): B + Left Mouse Click Drag

Deleting History:

As you work in Maya, most of actions create nodes in the construction history of the objects you work on.

Delete history when you want to delete modeling operations from your object’s history or any nodes that my slow down your scene.

Freezing Transformations - Sets new point of origin for any given back to zero

Box Modeling Tips:

-Always model facing the X axis

-Never delete Edges or Vertices by hitting Delete. To remove: Go to Edit Mesh / Delete Edge Vertex

-Selecting  a row of faces: select face, shift select 2nd face and double click.

-Repeats last action/tool: G

-Try setting the pivot points to center / bottom of object: makes for easier snapping to other objects or grid.

*Tip: To remove clutter or unwanted seen objects from the outliner: Go Display/ click on Shapes.

Parenting: Nesting objects into another’s objects hierarchy.

-To parent: Select child node then select parent node.

-Parent: P
-Unparent: Select Hierarchy, Shift P

*Tip: To select a parent object in group multiple parents hierarchy, press down key.


Outliner Tips:

Shift / click: Opens or closes all elements from the group.

Locking the camera:

-Select camera
-Select all input channels
-Right Mouse click / Lock selected

*Tip: To lock camera on previous position, set a key on all input channels in F1.
*Tip: Left / Right Brackets keys: Undo for camera move.


Creating a simple Rig with Mel Script and Nurb Controllers:

-Create Nurbs Curves
-Select Nurbs Curves
-Press Down Key (selects shape node in channel box)
-Shift Select 2nd object you want to parent
-Type in Command Line (Mel Box): parent -r -s